5 steps how to migrate from http to https for WordPress [video]
After you have got your SSL-certificate, you need to go through these five steps to fully migrate your WordPress website from http to https.
Since we are installing our clients SSL-certificates automatically, I'm going to assume that you have got your certificate installed on your domain already.
But having the certificate installed on your domain is only the first step. Now you need to transfer your website to the new address beginning with https. Follow me in this guide on how to do it for a WordPress site.
What you will learn in this blog post (and video)
1 Change the WordPress Address (URL) and Site Address (URL)
We will use the relocate method to change the address of your WordPress installation. Go to section ⤵
2 Change all internal references to the old http address
The database still contains lots of references to your http address. If you don't change those to https, your pages will show a warning that the page is not secure, even though the page itself loads from https. A simple tool will do this for us. Go to section ⤵
3 Redirect all incoming traffic and link juice to your https urls
We will add a 301 redirect to your .htaccess file that will effectively redirect all your incoming traffic and links to the new https urls. Go to section ⤵
4 Update all connecting apps with your new address
Most importantly, you need to tell Google Search Console of your new website address. But also other apps that communication with your website, such as payment gateways and social media apps. Go to section ⤵
5 Tell your visitors that they are on a safe website
For all websites, establishing trust is a key to success. And on an e-commerce site it is critical for conversions. So tell your clients about your SSL-certificate in strategic places. Go to section ⤵
1 Change the WordPress Address (URL) and Site Address (URL)
[This part in video] The first step is to change the base website url for WordPress. The easiest way to do this, is to use the relocate method.
- Add the below line to your wp-config.php file, using the hosting File Manager or your FTP client. Add it just before the line that says That's all, stop editing!
define('RELOCATE',true);Save the file, but keep it open as we will edit it soon. - Now, open your browser and go
https://yourdomain.com/wp-login.phpor, if you want it with www,https://www.yourdomain.com/wp-login.phpand log in on that address. This will automatically change the WordPress Address (URL) - Go to Settings → General and confirm that your WordPress Address (URL) is changed.
- Now, copy that field and paste it into Site Address (URL) and save.
- Go back to the file wp-config.php and change
define('RELOCATE',true);todefine('RELOCATE',false);. Save and close the file.
That's it. Now you have told WordPress to load from your new https-address!
2 Change all internal references to the old http address
[This part in video] You will notice that you still have lots of references in your content to the old http address, such as internal links and src attributes to media files. If you have such references on a page, the browser will display a warning that the page is not secure, even though it loads from a https address.
So we basically have to find all instances of http://yourdomain... in the database and replace them with https://yourdomain...
Sounds hard?
It isn't. Because we will use a simple plugin that will do the job for us.
However, you should always make a backup of your database before doing these changes. If you are hosted with us, it only takes one click to make a database backup. If you are hosted somewhere else, follow their instructions on how to make a database backup.
If you are using an , I suggest you inactivate your CDN plugin before continuing.
- Go to Plugins → Add new and search for Velvet blues Update URLs, install it and activate it.
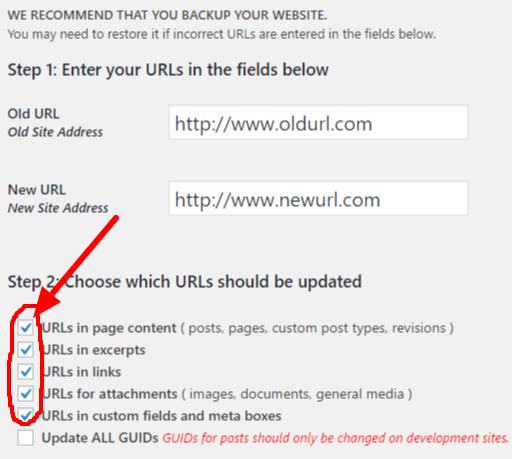
- Go to Tools → Update URLs
- Fill in Old URL and New URL
- Check all the checkboxes except the last one:
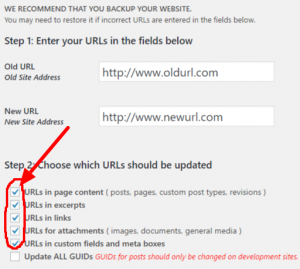
and hit the button Update URLs NOW
Done! If you have a caching plugin, empty your cache completely.
Now I suggest you uninstall the Velvet Blues plugin, since you won't need it anymore.
Check your site
Use JitBit's SSL Check to scan your site for any references to non-secure content. Your WordPress theme may have some image src attributes with http, or you may have some hardcoded links in widgets that start with http. The SSL Check will find them for you so you can fix them.
Another great tool is Why No Padlock, which is a little bit more precise than JitBit, but Why No Padlock checks only one page at a time, while JitBit crawls up to 200 pages on your website.
Troubleshooting site errors
If your site does not load properly or if you get warnings of unsecure content, here are some suggestions that might help you:
3 Redirect all incoming traffic and link juice to your https urls
[This part in video] Now you want all incoming traffic to your website to be redirected to the new address starting with https.
If someone is typing yourdomain.com directly into the browser address bar, you want them to be redirected to https...
But much more importantly, if other websites link to your website, you need to properly redirect the incoming link juice to the new https addresses. Only the 301 redirect (that signals "Permanently moved" to the search engines) transfers the link juice from incoming links to the moved pages.
The best way is to add a 301 redirect in your .htaccess file. There are plugins that can do this, but I strongly suggest that you keep the number of plugins to a minimum, for better performance and less update management.
In your domain root folder, find the file named .htaccess. Edit it with your File Manager or with an FTP client.
Copy the below code and paste it at the beginning of the file.
# SSL Redirect by ServeU.net
RewriteEngine On
RewriteCond %{HTTPS} off
RewriteRule (.*) https://%{HTTP_HOST}%{REQUEST_URI} [R=301,L]
# END SSL Redirect by ServeU.net
Save and close the file.
Check that your redirect works, by going to a sub page (not the homepage) of your website, and remove the s in the beginning https. Make sure that you get redirected to the same https address.
4 Update all connecting apps with your new URL
[This part in video] Now you have done all that is needed on your website. But don't forget all the important connections you have with the world around your website.
The most important one is Google Search Console. You will have to add your https adress as a new site.
- Go to https://www.google.com/webmasters/tools/ and log in.
- Click "Add a Property"
- Enter the URL and click continue. Follow the instructions to verify your site.
- Click on Sitemaps and find the button Add/Test Sitemap on the right.
- Submit the address to your XML sitemap (if you use Yoast SEO, your sitemap address is
sitemap_index.xml)
Use this checklist to change all other applications that may have a connection or a link to your website:
- Facebook Apps
- Facebook Page link to your website
- Twitter Apps
- Twitter profile link to your website
- Pinterest profile link to your website
- Any other Social Media account that links to your site
- Any other websites you own that links to your site
- Google Analytics Profile URL
- If you have submitted any disavow requests in Google Search Console, go there and change them
5 Tell your visitors that they are on a safe website
[This part in video] Making your visitors feel safe can increase your conversion rate dramatically. So be sure to communicate in strategic places that they are on a secure website. Most providers of SSL-certificates offer a seal in form of an image that you can place on your website.
On this website, we have an SSL-certificate from Comodo. Their trust seal, called "TrustLogo", looks like this:
If you hover over it, you will see some more specifics and proof of security. In the case of Comodo, you can also link to a verification page on their domain, conveying even more trust to your visitors. Click here to see that verification page for our certificate.
Spell out to your visitors how strong the encryption is and what level of warranty that comes with the certificate.
Summary
As you can see, migrating from http to https takes some planning and some efforts, but is is not too difficult, even for the non-techie. I would say that it takes no more than an hour for a normal website, and hey, it is worth it! Https will instill trust with your visitors, and higher rankings on Google, so what are you waiting for? Get your SSL-certificate for only $19 here.
How does it work for you? Are you missing something in our guide? We'd love to hear your thoughts in a comment.

5 Comments
as per the guideline when i apply 1st step for wp-config.php with given code then unable to even access my admin for your next step… any suggestions…
Hi Sagar! Can you describe what happens when you go to /login.php – do you get any error message?
when I tried to login with your 1.2 it gives below error:
Please forward this error screen to http://www.eb5indiainvest.com‘s WebMaster.
The server can not find the requested page….
unfortunately unable to process further with your given steps.
Regards,
Sagar
i have changed wp-config as you mentioned in 1st step but ‘privacy error’ showing while login with https url
That is normal until you have completed the next steps. Good luck!